Set Upload Size, Dimension, and Duration Limits
- Author
 Joseph TrasattiMember of technical staff
- Published
- Section
- No-Code
- Length
- 6 min read3 sources cited
Set file bytes, image dimensions, video duration, and allowed formats as separate rules. Mirror them in the no-code interface for immediate feedback, but enforce them in the server-side upload preset. Normalize dimensions only when altered source media remains valid; otherwise reject the upload and explain which rule failed.
Prerequisites
Before configuring the uploader, write down the acceptance contract for each place that receives media. You need the permitted formats, maximum file bytes, maximum image width and height, and maximum video duration. Obtain the actual requirements from the system that consumes the asset; do not copy a limit from another workflow merely because both accept uploads.
You also need access to both the no-code upload component and the server-side upload preset it calls. If the flow uploads directly from a browser, decide whether it should use a signed or unsigned preset before proceeding. The security and configuration consequences are covered in signed versus unsigned upload presets.
Configure the guardrails
-
Map every route by which a file can arrive.
List the visible no-code picker, any drag-and-drop input, automated workflow, mobile input, and direct upload call. Cloudinary’s upload guide, checked 26 August 2026, describes uploads from server-side code, browsers, mobile applications, remote URLs, and other file sources. A rule attached only to the visible picker does not cover those other routes.
Assign every route to the same server-side policy or to a deliberately different preset. If an automation needs larger videos than a public form, give it a separate preset with a separate contract. Do not widen the public preset to accommodate an unrelated workflow.
-
Set four independent constraints.
Image dimensions, video duration, file bytes, and allowed formats answer different questions and must be configured separately. A JPEG can have acceptable dimensions but too many bytes. A small MP4 can exceed the permitted duration. An unsupported format can be tiny and short. Passing one check says nothing about the others.
Record the policy in a matrix before touching the builder:
Constraint Value to decide Enforcement result File bytes Maximum accepted byte count Reject above the limit Image dimensions Maximum width and maximum height Reject or normalize, chosen explicitly Video duration Maximum accepted running time Reject or trim, chosen explicitly Format Exact permitted image and video formats Reject formats outside the list Keep the format list narrow enough to match what the next system can process. If formats require more than a simple allowlist, define the wider media format policy before configuring this preset.
-
Put the hard rules in the upload preset.
Configure the preset’s file-size limit and allowed formats, then attach any approved incoming transformation. Cloudinary’s upload preset documentation, checked 26 August 2026, identifies
max_file_sizeandallowed_formatsas protections for unsigned presets and says incoming transformations can normalize dimensions or duration before storage.These are the controls that matter when a client is bypassed. Someone who avoids the no-code form can omit its checks, change its JavaScript, or submit directly to the upload endpoint. They still reach the preset, so the server-side preset limits are what stop bypassed clients from storing oversized or disallowed assets.
Do not treat an obscure preset name as protection. An unsigned preset name is visible in client-side code. Its safety comes from the restrictions defined in it. For a signed flow, ensure the server signs only the preset and parameters approved for that upload class; otherwise the visible form and the signed request can describe different policies.
-
Mirror the preset limits in the no-code interface.
Add the same byte, dimension, duration, and format values to the picker wherever the component supports them. Show the relevant condition before selection and return a specific failure message afterward: which constraint failed, the submitted value if available, and the accepted limit.
Client-side limits improve feedback because the user can fix a file before waiting for an upload attempt. They are not the enforcement boundary. Keep the preset as the source of truth and treat the interface settings as a copy maintained for usability. If the builder cannot express one of the four constraints, leave that check to the server rather than replacing it with a different rule.
-
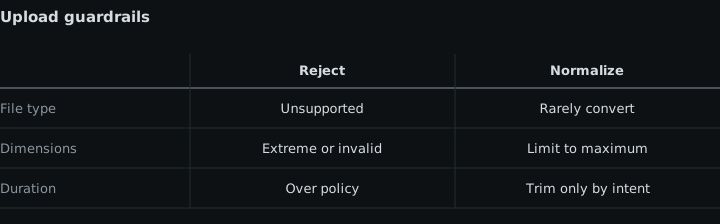
Choose normalization or rejection for dimensions and duration.
Cloudinary’s upload-parameter documentation, checked 26 August 2026, says an incoming transformation changes the original during upload and before storage; its examples include limiting image resolution and clipping a long video. That makes an incoming transformation appropriate when the stored envelope matters more than preserving the submitted source exactly.
Use dimension normalization when a larger source remains valid after it is reduced and the workflow explicitly wants the reduced asset as its stored original. This prevents storage of the larger dimensions. Keep this separate from delivery cropping: choosing the subject or aspect ratio is a different decision, addressed by content-aware cropping versus fixed crop rules.
Reject instead when normalization would hide an invalid source. If the contract requires the submitted image itself to meet specified dimensions, silently resizing it makes a failed submission look compliant. The same test applies to video: trimming is normalization, not validation. Use it only when discarding material beyond the duration boundary is an accepted part of the product. If the complete source must fit within the duration limit, reject it.
Do not use an eager transformation for this job. Eager processing creates a derivative after upload while retaining the uploaded original; an incoming rather than eager transformation is the relevant control when the aim is to normalize before storage.
-
Test each constraint in isolation and test the bypass.
Build a small acceptance set containing:
- one file that passes all four rules;
- one file that exceeds only the byte limit;
- one image that exceeds only a dimension limit;
- one video that exceeds only the duration limit;
- one file whose format is not allowed;
- one file that fails more than one rule.
Submit the set through the no-code interface first. Confirm that client-side failures are specific and that the valid file reaches storage. Then submit the same cases directly to the upload endpoint with the preset, bypassing the interface. The files intended for rejection must still fail, or the rule exists only as feedback.
For normalization cases, inspect the stored asset rather than merely accepting a successful response. Confirm that the stored width and height or stored duration match the policy, and confirm that the result has not lost content the workflow needs. A successful upload is not sufficient evidence that the transformation was appropriate.
-
Release the preset and interface as one policy change.
Update the server-side preset first, then publish the matching no-code configuration. This order may briefly produce stricter server errors, but it does not leave a period in which the interface advertises a rule the server does not enforce. Record the four values beside the preset name and identify whether dimensions and duration reject or normalize.
Repeat the direct-endpoint test whenever a preset or no-code component changes. A visual check of the form cannot show whether the server-side guardrails still apply.
Expected result
The no-code interface reports invalid selections early, while the upload preset independently enforces the accepted byte count and formats even when the interface is bypassed. Image dimensions and video duration have separate, documented outcomes. Assets are normalized before storage only where alteration is acceptable; sources that must satisfy the contract unchanged are rejected.
Sources
- upload guide, checked 26 August 2026cloudinary.com
- upload preset documentation, checked 26 August 2026cloudinary.com
- upload-parameter documentation, checked 26 August 2026cloudinary.com
See also
Build a visual transcoding flow that waits for every required rendition, verifies failures, and publishes only complete video sets.
Connect a media flow’s canvas and run records to downstream logs using redacted block data, outcomes, retries, timing, and correlation IDs.
Classify side effects, persist recovery state, and route retries, compensation, and manual review without duplicating work after a partial failure.
Set ownership, match assets to product IDs, configure an Akeneo flow, separate missing media from sync failures, and choose a cost-aware schedule.